Demo
Pre Requisite: Note the Model ID and Artifact details
- You would need to note down the Model ID, and Model Artifact details from GCS.

Steps to import model file from Google Vertex AI
- Navigate to your desired workspace in Inferless and Click on
"Add a Model"button that you see on the top right. An import wizard will open up.
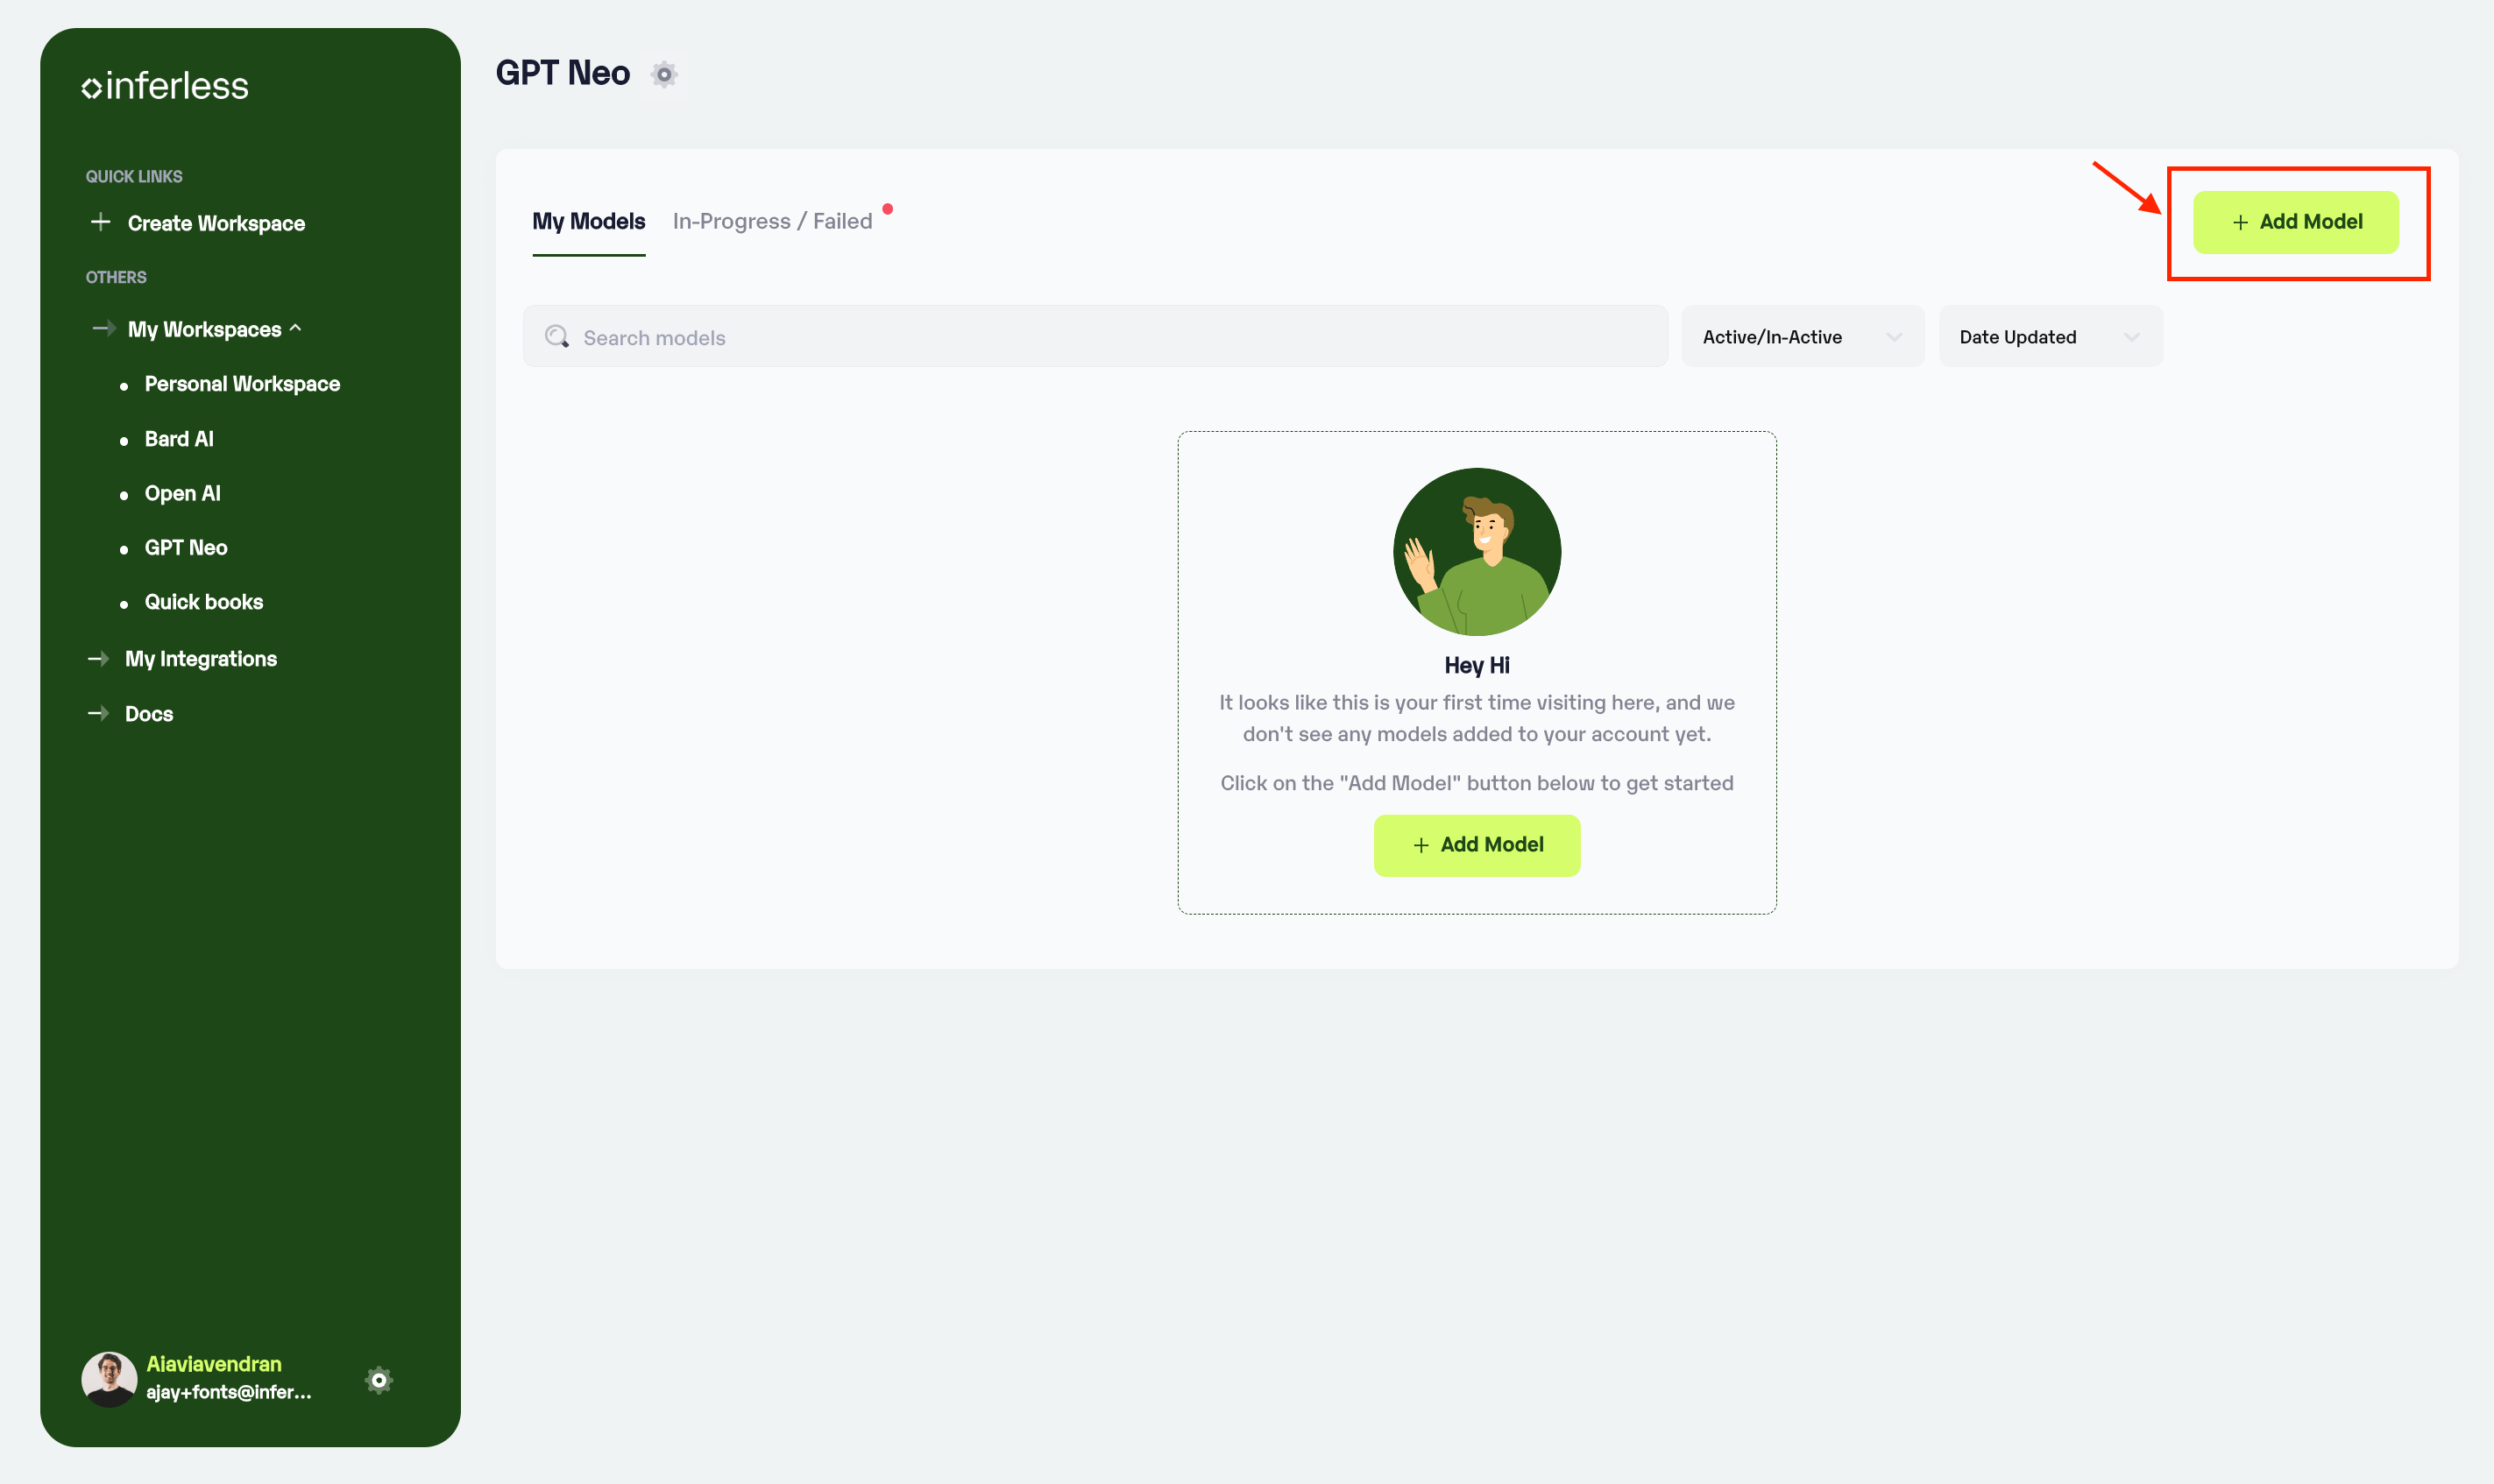
Click on Add Model
Step 1: Choose the framework on which your model was trained.
-
Choose your
**model training framework.** -
In case your desired framework is not available, we have provided detailed how-to guides for your reference
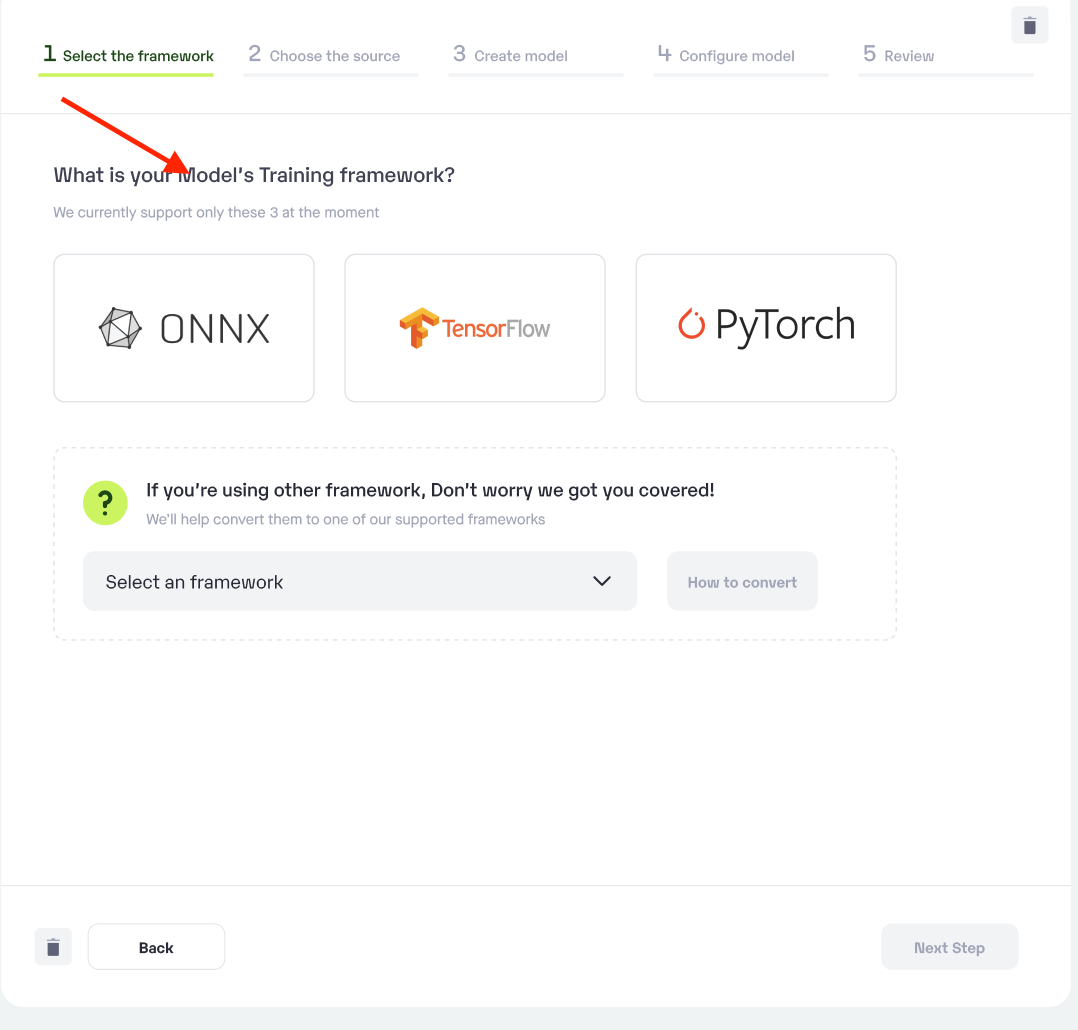
Choose the training framework used for your model
Step 2: Choose the source of your model.
-
Since we are using a model from Google Vertex AI in this example, select Model Repository
-
To proceed with the upload, you will need to connect your
GCP Vertex account. This is a mandatory step as this helps us in downloading the file from them.

- If you are using Inferless for the first time and have not added any providers before, click on the
"Add Provider"button (+).
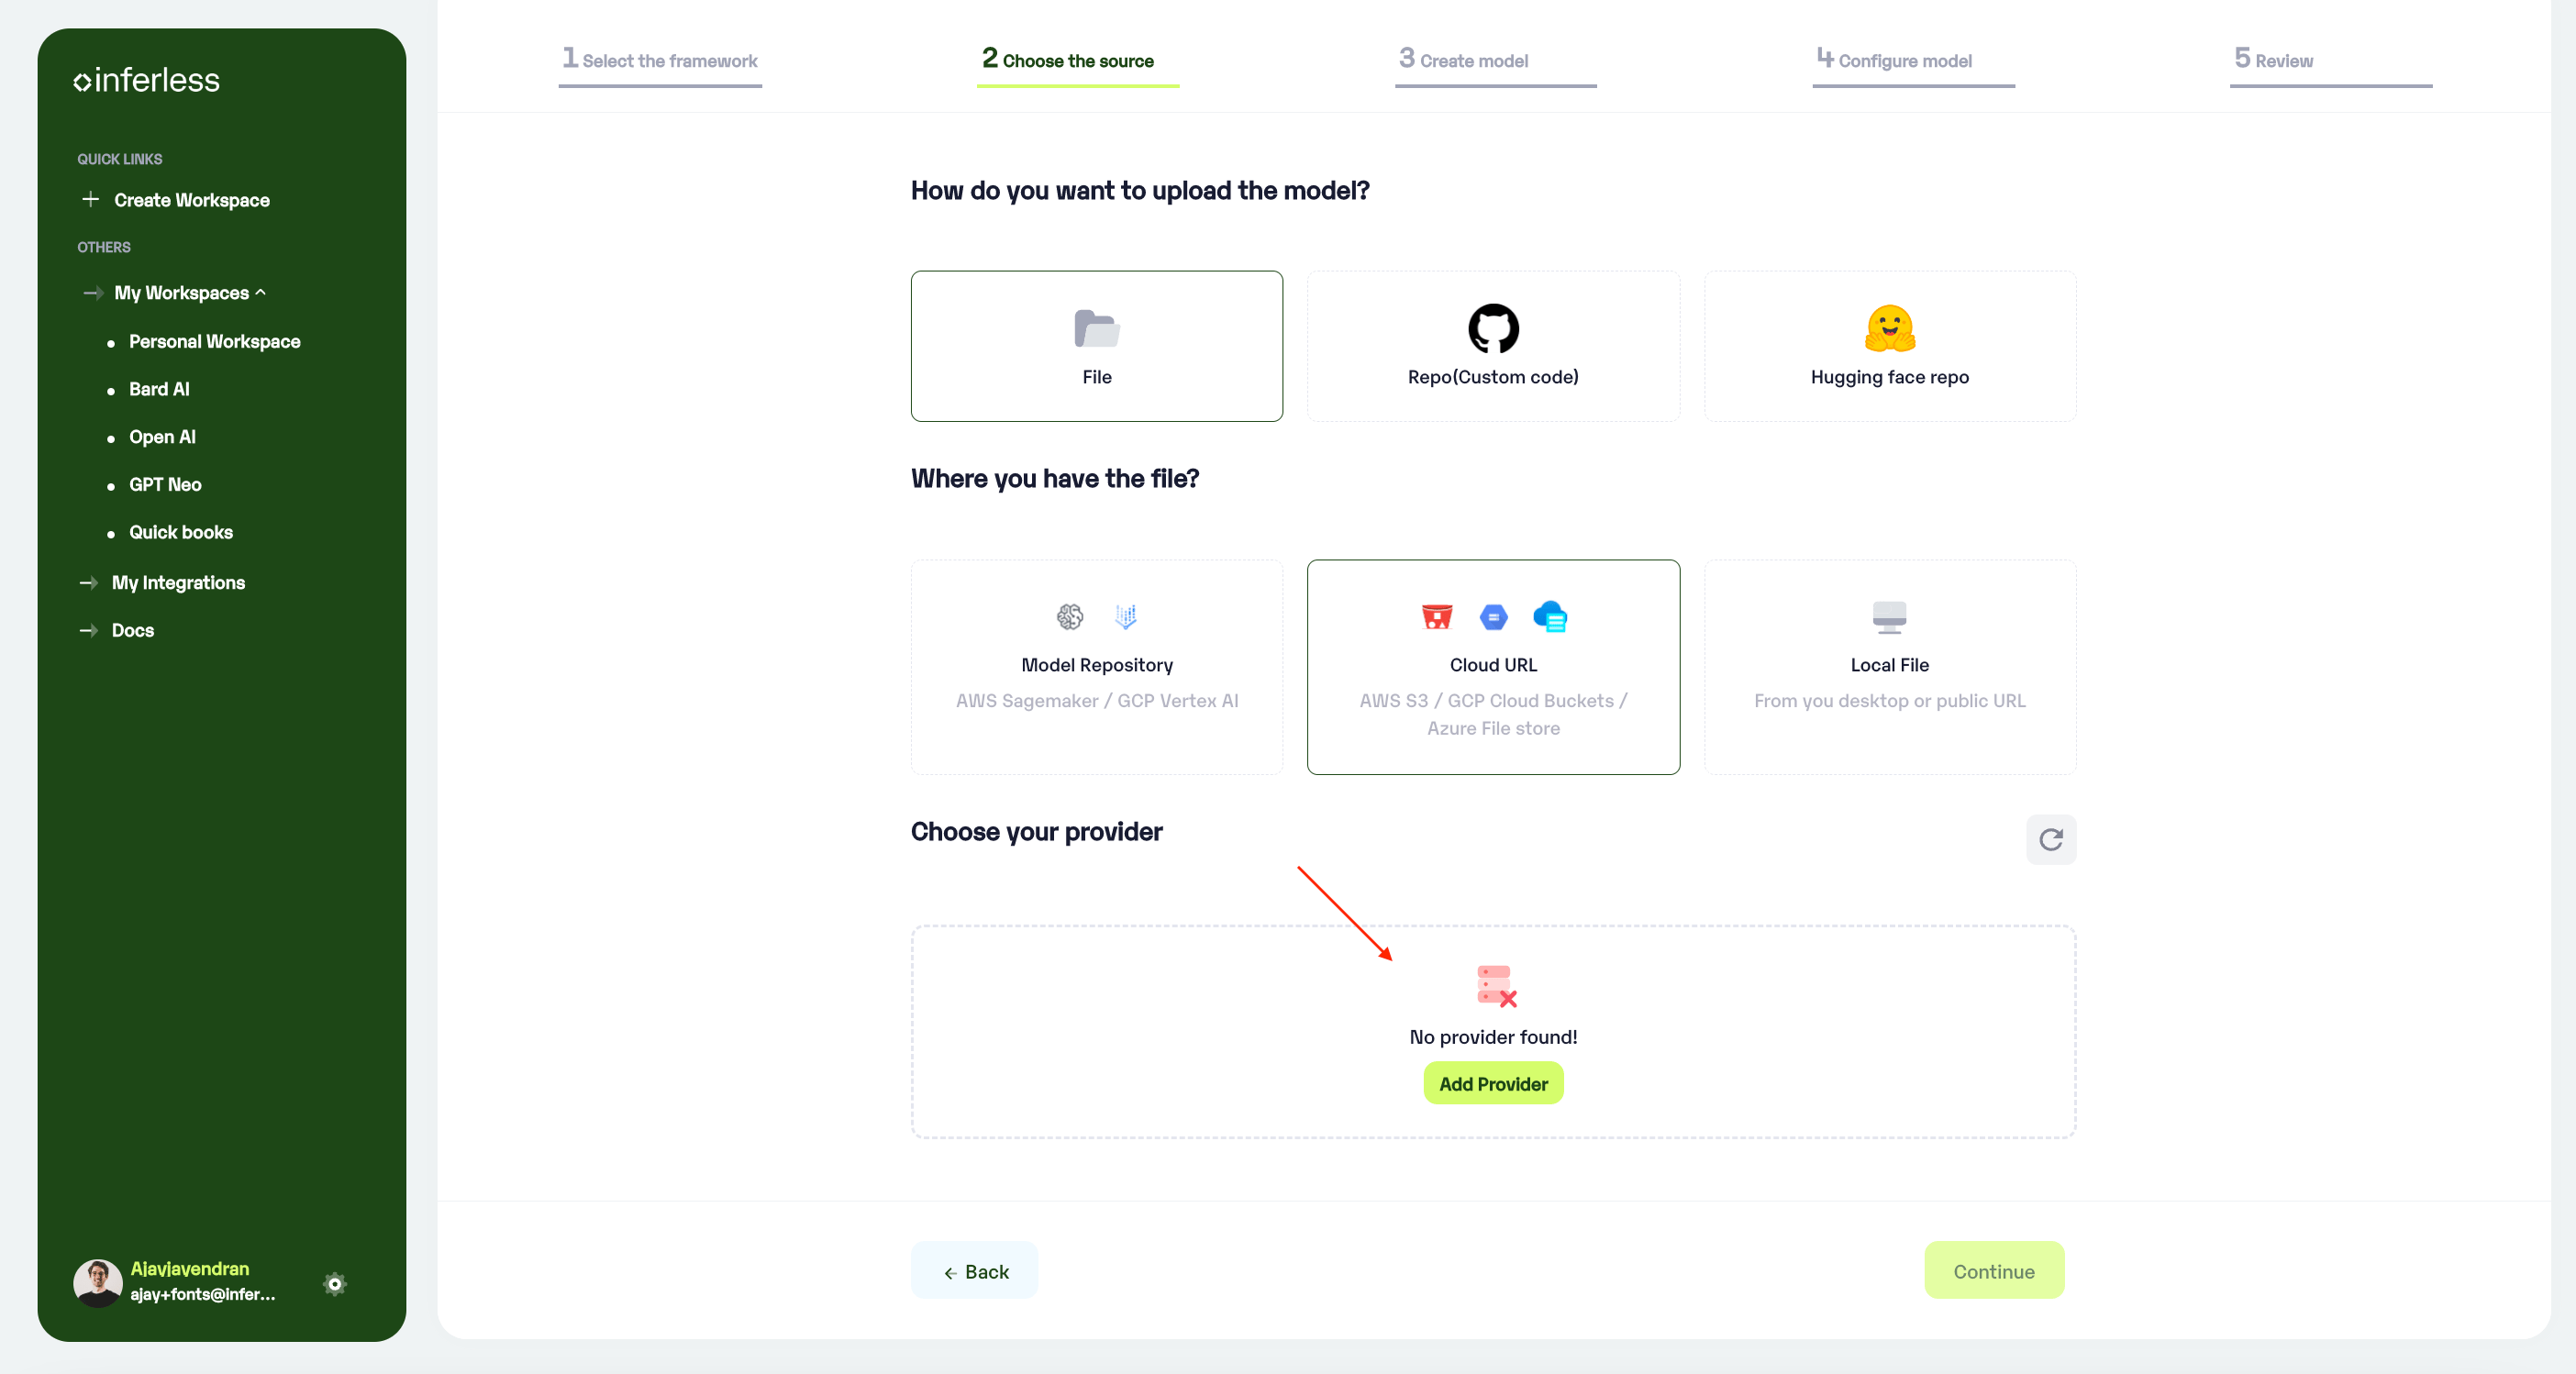
Click on Add provider to add your HF and Github accounts
- This would open a new tab with
"My Integrations". You can click connect on the necessary accounts there.

- If you have any queries in downloading your credential JSON from GCP. Once you click Connect Account, you can refer to the documentation on the right.

- Once you have completed, you can come back to this page and click the
refreshbutton provided. You would be able to see the added accounts then.
Step 3: Enter the model details
-
Model Name: Desired name of the model that you wish to given in Ver
-
Model ID: Enter the name of the Model ID that is given in Vertex AI
-
Model Region: Choose the region where the model has been loaded from Vertex AI.
-
Sample Input: Enter an example of how the input should be formatted for the model in JSON format.
-
Sample Output: Enter an example of how the output would be formatted for the model in JSON format.

- After clicking next, you may notice a “Please Wait” status, which means that we are validating your model for requirements. If the validation is successful, the next step will open up. If there are any validation issues, they will be notified to you.

Step 4: Model Configuration
After successful validation, you will move to the next step where you will be asked to choose the configuration for the model.
GPU and Machine Type selection
GPU Type: We provide all types of GPUs, you can choose your required GPU from the dropdown list.
Machine Type: Choose between our Shared and Dedicated GPU options. Opt for a Shared GPU to optimize costs and provide you with 50% of the vRAM. Alternatively, the Dedicated GPU provides exclusive resources, making it the ideal choice for deploying large models.
Choose the Minimum and Maximum replicas
Min replica - The number of inference workers to keep on at all times.
Max replica - The maximum number of inference workers to allow at any point in time
In case you would like to set up an Automatic rebuild for your model, enable it. You would need to set up a webhook for this method. Click here for more details.
Using the Custom Runtime
In the Advance configuration, we have the option to select the custom runtime. First, click on the Add runtime to upload the config.yaml file, give any name and save it. Choose the runtime from the drop-down menu and then click on continue.
Using Volume
Volume allows you to store the model files on NFS-like writeable volumes, which can store model parameters to help with cold start. Click on the Add volume to create a volume and select it from the dropdown menu.

Step 5: Review your model details
-
Once you click “Continue,” you will be able to review the details added for the model.
-
If you would like to make any changes, you can go back and make the changes.
-
Once you have reviewed everything, click “Submit” to start the model import process.
Step 6: Run your model
- Once you click submit, the model import process will start.
- It may take some time to complete the import process, and during this time, you will be redirected to your workspace and can see the status of the import under
"In Progress/Failed"tab.
<Add Image here> - If you encounter any errors during the model import process or if you want to view the build logs for any reason, you can click on the three dots menu and select “View build logs”. This will show you a detailed log of the import process, which can help you troubleshoot any issues you may encounter.
- Post upload, the model will be available under “My Models”
- You can then select the model and go to
-> API -> Inference Endpoint details.Here you would find the API endpoints that can be called. You can click on the copy button on the right and can call your model after modifying the input details.
- It may take some time to complete the import process, and during this time, you will be redirected to your workspace and can see the status of the import under
Extra Step: API key details
-
In case you need help with API Keys:
-
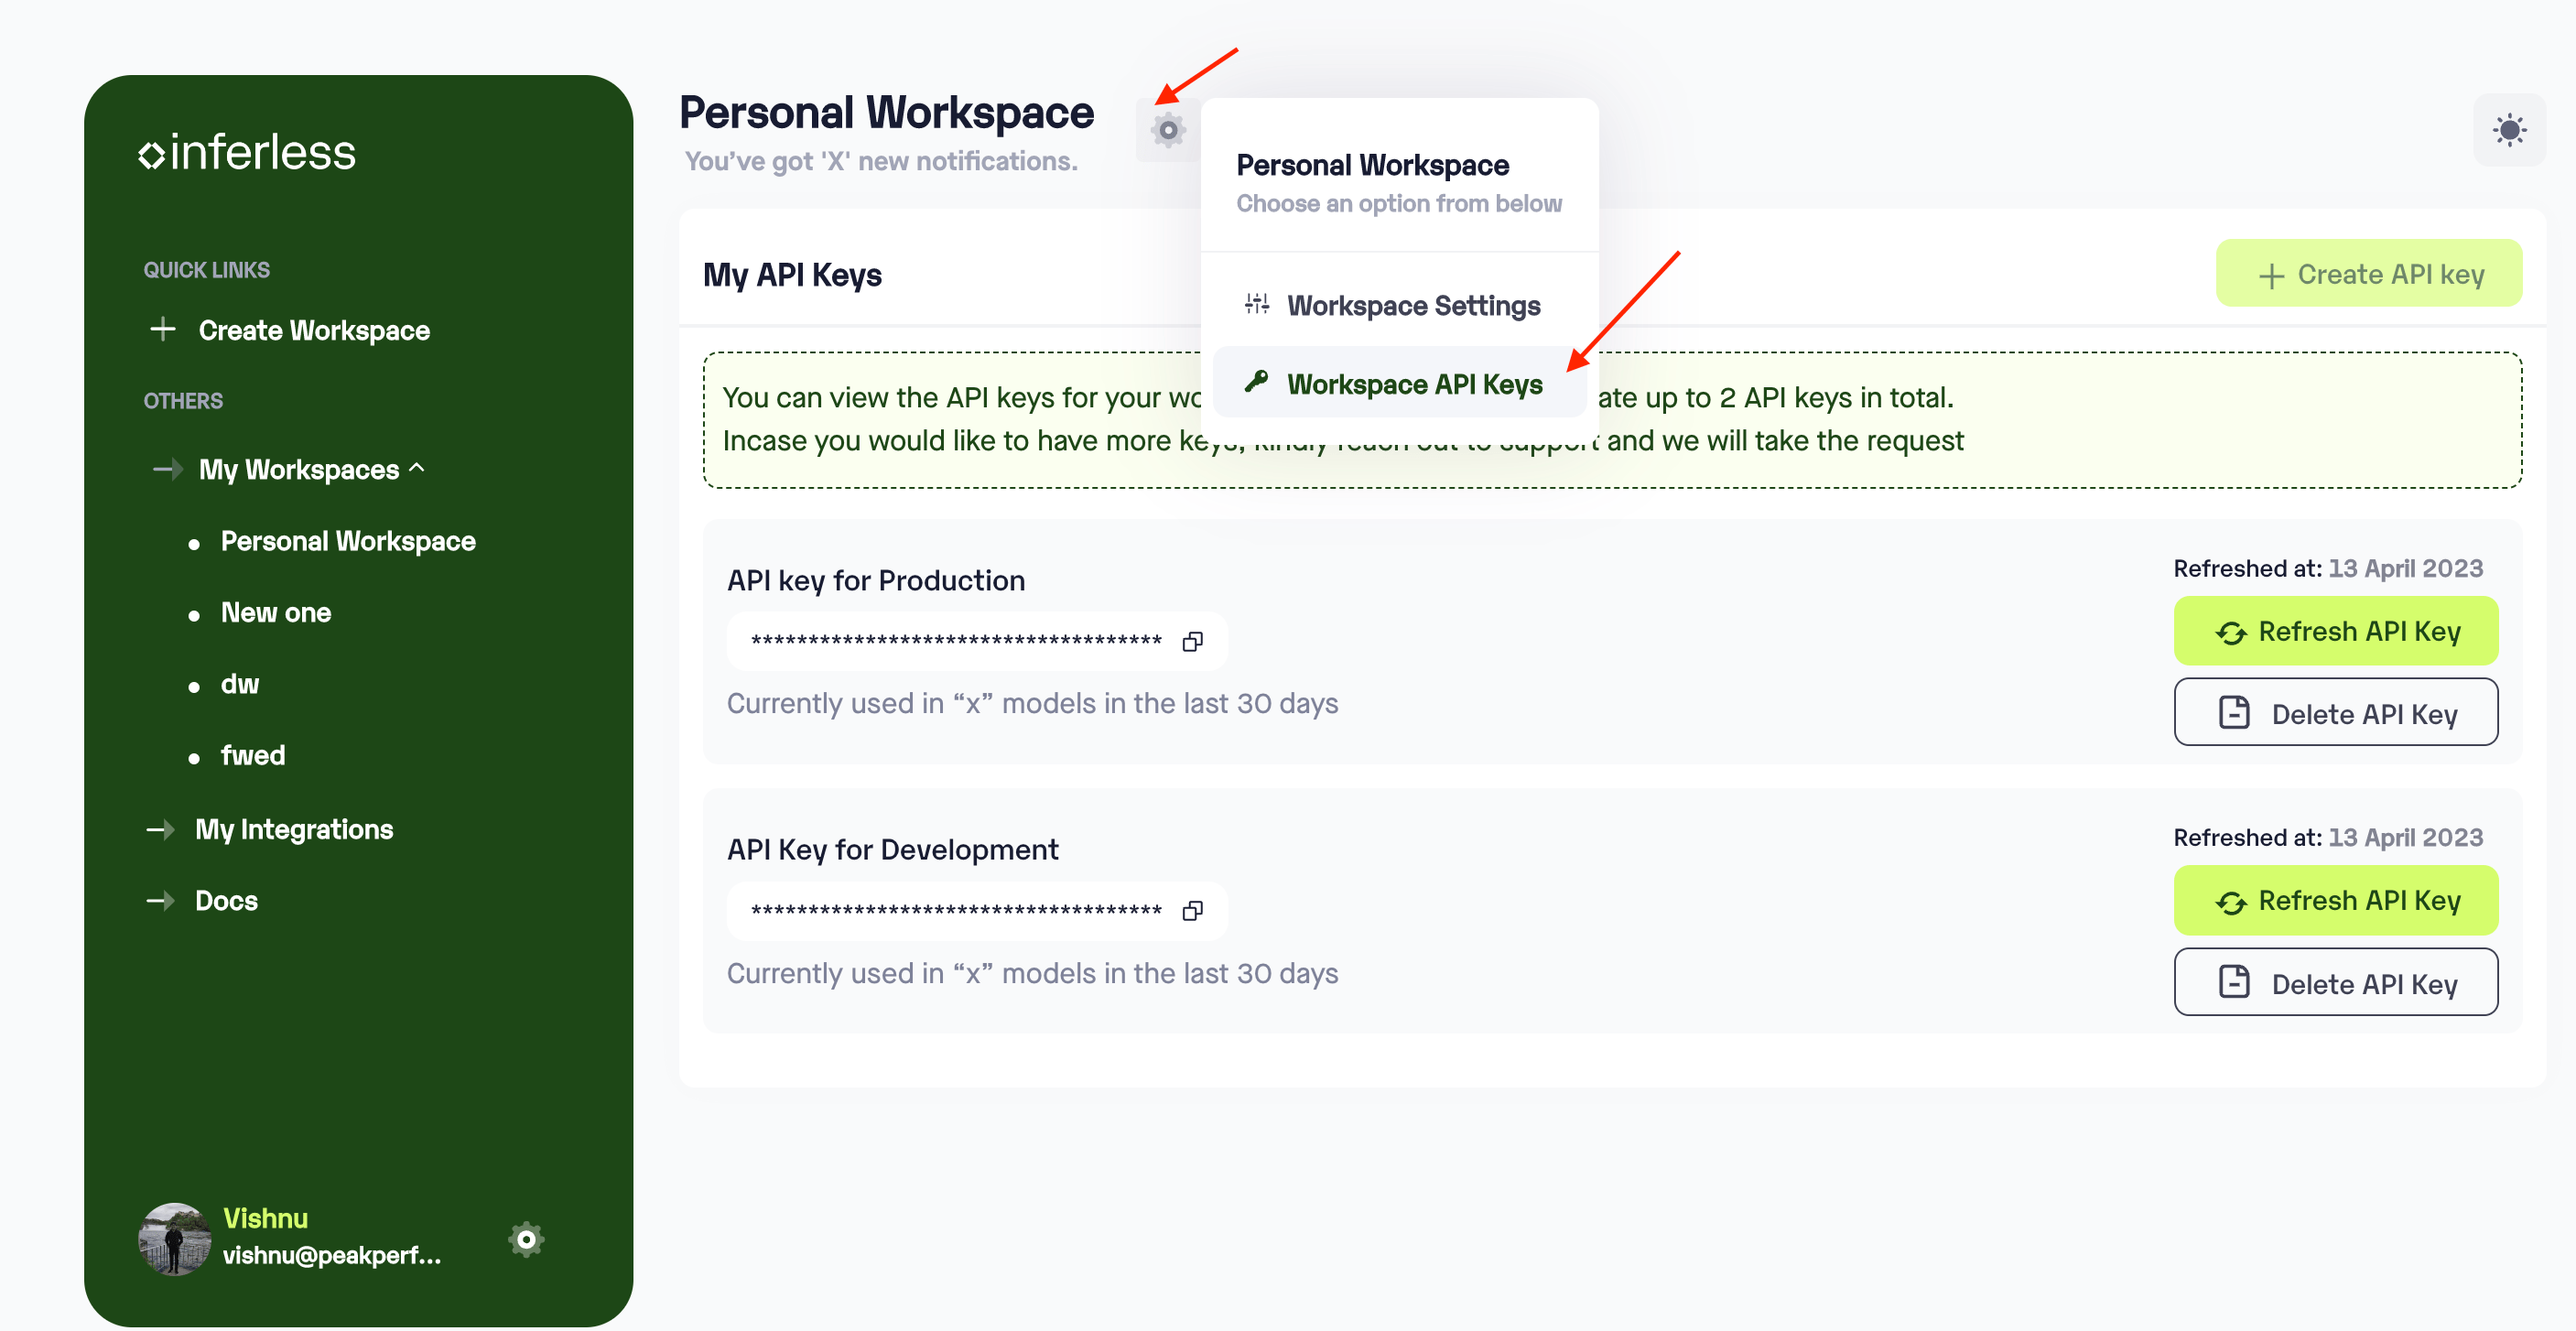
Click on settings, available on the top, next to your Workspace Name
-
Click on “Workspace API keys”
-
You can view the details of your key or generate a new one
Sample for now