> ## Documentation Index
> Fetch the complete documentation index at: https://docs.inferless.com/llms.txt
> Use this file to discover all available pages before exploring further.
# Deploy Mixtral-8x7B for 52 Tokens/Sec on a Single GPU
> Mixtral 8x7B, a high-quality sparse mixture of experts model (SMoE) with open weights. Licensed under Apache 2.0. Mixtral outperforms Llama 2 70B on most benchmarks with 6x faster inference
## Introduction
[Mixtral-8x7B](https://huggingface.co/mistralai/Mixtral-8x7B-v0.1) is a Sparse Mixture of Experts (SMoE) with 46.7B parameters and one of the best open large language models (LLM). Mixtral was trained with a context size of 32k tokens and it outperforms or matches Llama-2 70B and GPT-3.5 across all evaluated benchmarks. Mixtral and Mistral 7B share the same structure, but Mixtral's layers consist of 8 feedforward blocks or experts. In each layer, a router network chooses two experts to handle the current state of a token and merges their outputs. Although each token interacts with only two experts, the chosen ones can vary at each step. This design allows each token to access a total of 47B parameters, yet during inference, only 13B of these parameters are actively utilized.
## Our Observations
We experimented [Mixtral 8x7B](https://huggingface.co/mistralai/Mixtral-8x7B-v0.1) with various configurations using [PyTorch](https://github.com/pytorch-labs/gpt-fast), [vLLM](https://github.com/vllm-project/vllm), [AutoGPTQ](https://github.com/PanQiWei/AutoGPTQ), and [HQQ](https://github.com/mobiusml/hqq). For all our experiments, we have set the max-token to 256 and done all experiments on a single A100(80GB) GPU machine.
For fast inference, we took advantage of PyTorch(nightly) optimizations (GitHub[ repository](https://github.com/pytorch-labs/gpt-fast)). We have deployed an 8-bit[ quantize model](https://huggingface.co/Inferless/Mixtral-8x7B-v0.1-int8-GPTQ) and got an average token generation rate of 52.03 token/sec. We also tried deploying a 4-bit quantized model via vLLM(0.2.7), Auto-GPTQ(0.6.0) and HQQ(0.1.2) as mentioned in our observations below:
| Library | Bits | Inference Time | Cold Start Time | Token/Sec | Latency/Token | VRAM Required |
| -------- | ----- | -------------- | --------------- | --------- | ------------- | ------------- |
| PyTorch | 8 bit | 4.94 sec | 11.48 sec | 52.03 | 19.22 ms | 43.78 GB |
| vLLM | 4 bit | 6.59 sec | 36.62 sec | 36.39 | 27.47 ms | 65.66 GB |
| AutoGPTQ | 4 bit | 38.44 sec | 203.45 sec | 7.11 | 140.76 ms | 22.68 GB |
| HQQ | 4 bit | 255.09 sec | 16.19 sec | 5.16 | 193.47 ms | 24.70 GB |
## Defining Dependencies
We are using [gpt-fast](https://github.com/pytorch-labs/gpt-fast)(GitHub[ repository](https://github.com/pytorch-labs/gpt-fast) from [PyTorch Labs](https://github.com/pytorch-labs)), written in native PyTorch. Install the [PyTorch nightly](https://pytorch.org/get-started/locally/), [Sentencepiece](https://pypi.org/project/sentencepiece/) and [Huggingface\_hub](https://pypi.org/project/huggingface-hub/).
## Constructing the GitHub/GitLab Template
First, to quickly construct the GitHub/GitLab template, copy all the files from [this Inferless repository](https://github.com/rbgo404/mixtral-fast). After that, you can create the [app.py](https://github.com/inferless/Mixral-8x7B/blob/main/app.py) and [inferless-runtime-config.yaml](https://github.com/inferless/Mixral-8x7B/blob/main/inferless-runtime-config.yaml).
```
Mixtral-8x7B/
├── app.py
├── GPTQ.py
├── _model.py
├── eval.py
├── generate.py
├── get_model.py
├── quantize.py
├── tp.py
├── input_schema.py
└── inferless-runtime-config.yaml
```
You can also add other files to this directory.
## Create the class for inference
In the [app.py](https://github.com/inferless/Mixral-8x7B/blob/main/app.py) we will define the class and import all the required functions
1. `def initialize`: In this function, you will download and initialize your model. Here we have used the `model_initialize` function from the [get\_model](https://github.com/inferless/Mixral-8x7B/blob/main/get%5Fmodel.py) script, this loads and initialize the model. You can customize the `get_model` script according to your requirements. Also in this function, you can define any variable that you want to use during inference.
2. `def infer`: This function gets called for every request that you send. Here you can define all the steps that are required for the inference. You can also pass custom values for inference and pass it through `inputs(dict)` parameters.
3. `def finalize`: This function cleans up all the allocated memory.
```python theme={null}
import contextlib
from get_model import model_initialize,encode_tokens,generate
from huggingface_hub import snapshot_download
import os
class InferlessPythonModel:
def initialize(self):
repo_id = "Inferless/Mixtral-8x7B-v0.1-int8-GPTQ"
model_store = f"/home/{repo_id}"
os.makedirs(f"/home/{repo_id}", exist_ok=True)
snapshot_download(repo_id,local_dir=model_store)
self.tokenizer, self.model = model_initialize(f"{model_store}/model_int8.pth")
self.callback = lambda x : x
def infer(self, inputs):
prompt= inputs['prompt']
encoded = encode_tokens(self.tokenizer,prompt, bos=True, device="cuda")
prof = contextlib.nullcontext()
with prof:
y, metrics = generate(
self.model,
encoded,
max_new_tokens=256,
draft_model=None,
speculate_k=5,
interactive=False,
callback=self.callback,
temperature=0.8,
top_k=200,)
return {'generated_result': self.tokenizer.decode(y.tolist())}
def finalize(self):
pass
```
## Creating the Custom Runtime
This is a mandatory step where we allow the users to upload their custom runtime through [inferless-runtime-config.yaml](https://github.com/inferless/Mixral-8x7B/blob/main/inferless-runtime-config.yaml).
```python theme={null}
build:
cuda_version: "12.1.1"
system_packages:
- "libssl-dev"
python_packages:
- "--index-url https://download.pytorch.org/whl/nightly/cu121--pre torch"
- "torchvision"
- "torchaudio"
- "sentencepiece==0.1.99"
- "huggingface-hub==0.20.2"
- "accelerate==0.25.0"
```
## Method A: Deploying the model on Inferless Platform
Inferless supports multiple ways of [importing your model](https://docs.inferless.com/model-import/file-structure-req/file-structure-requirements). For this tutorial, we will use GitHub.
### Step 1: Login to the inferless dashboard can click on Import model button
Navigate to your desired workspace in Inferless and Click on `Add a custom model` button that you see on the top right. An import wizard will open up.
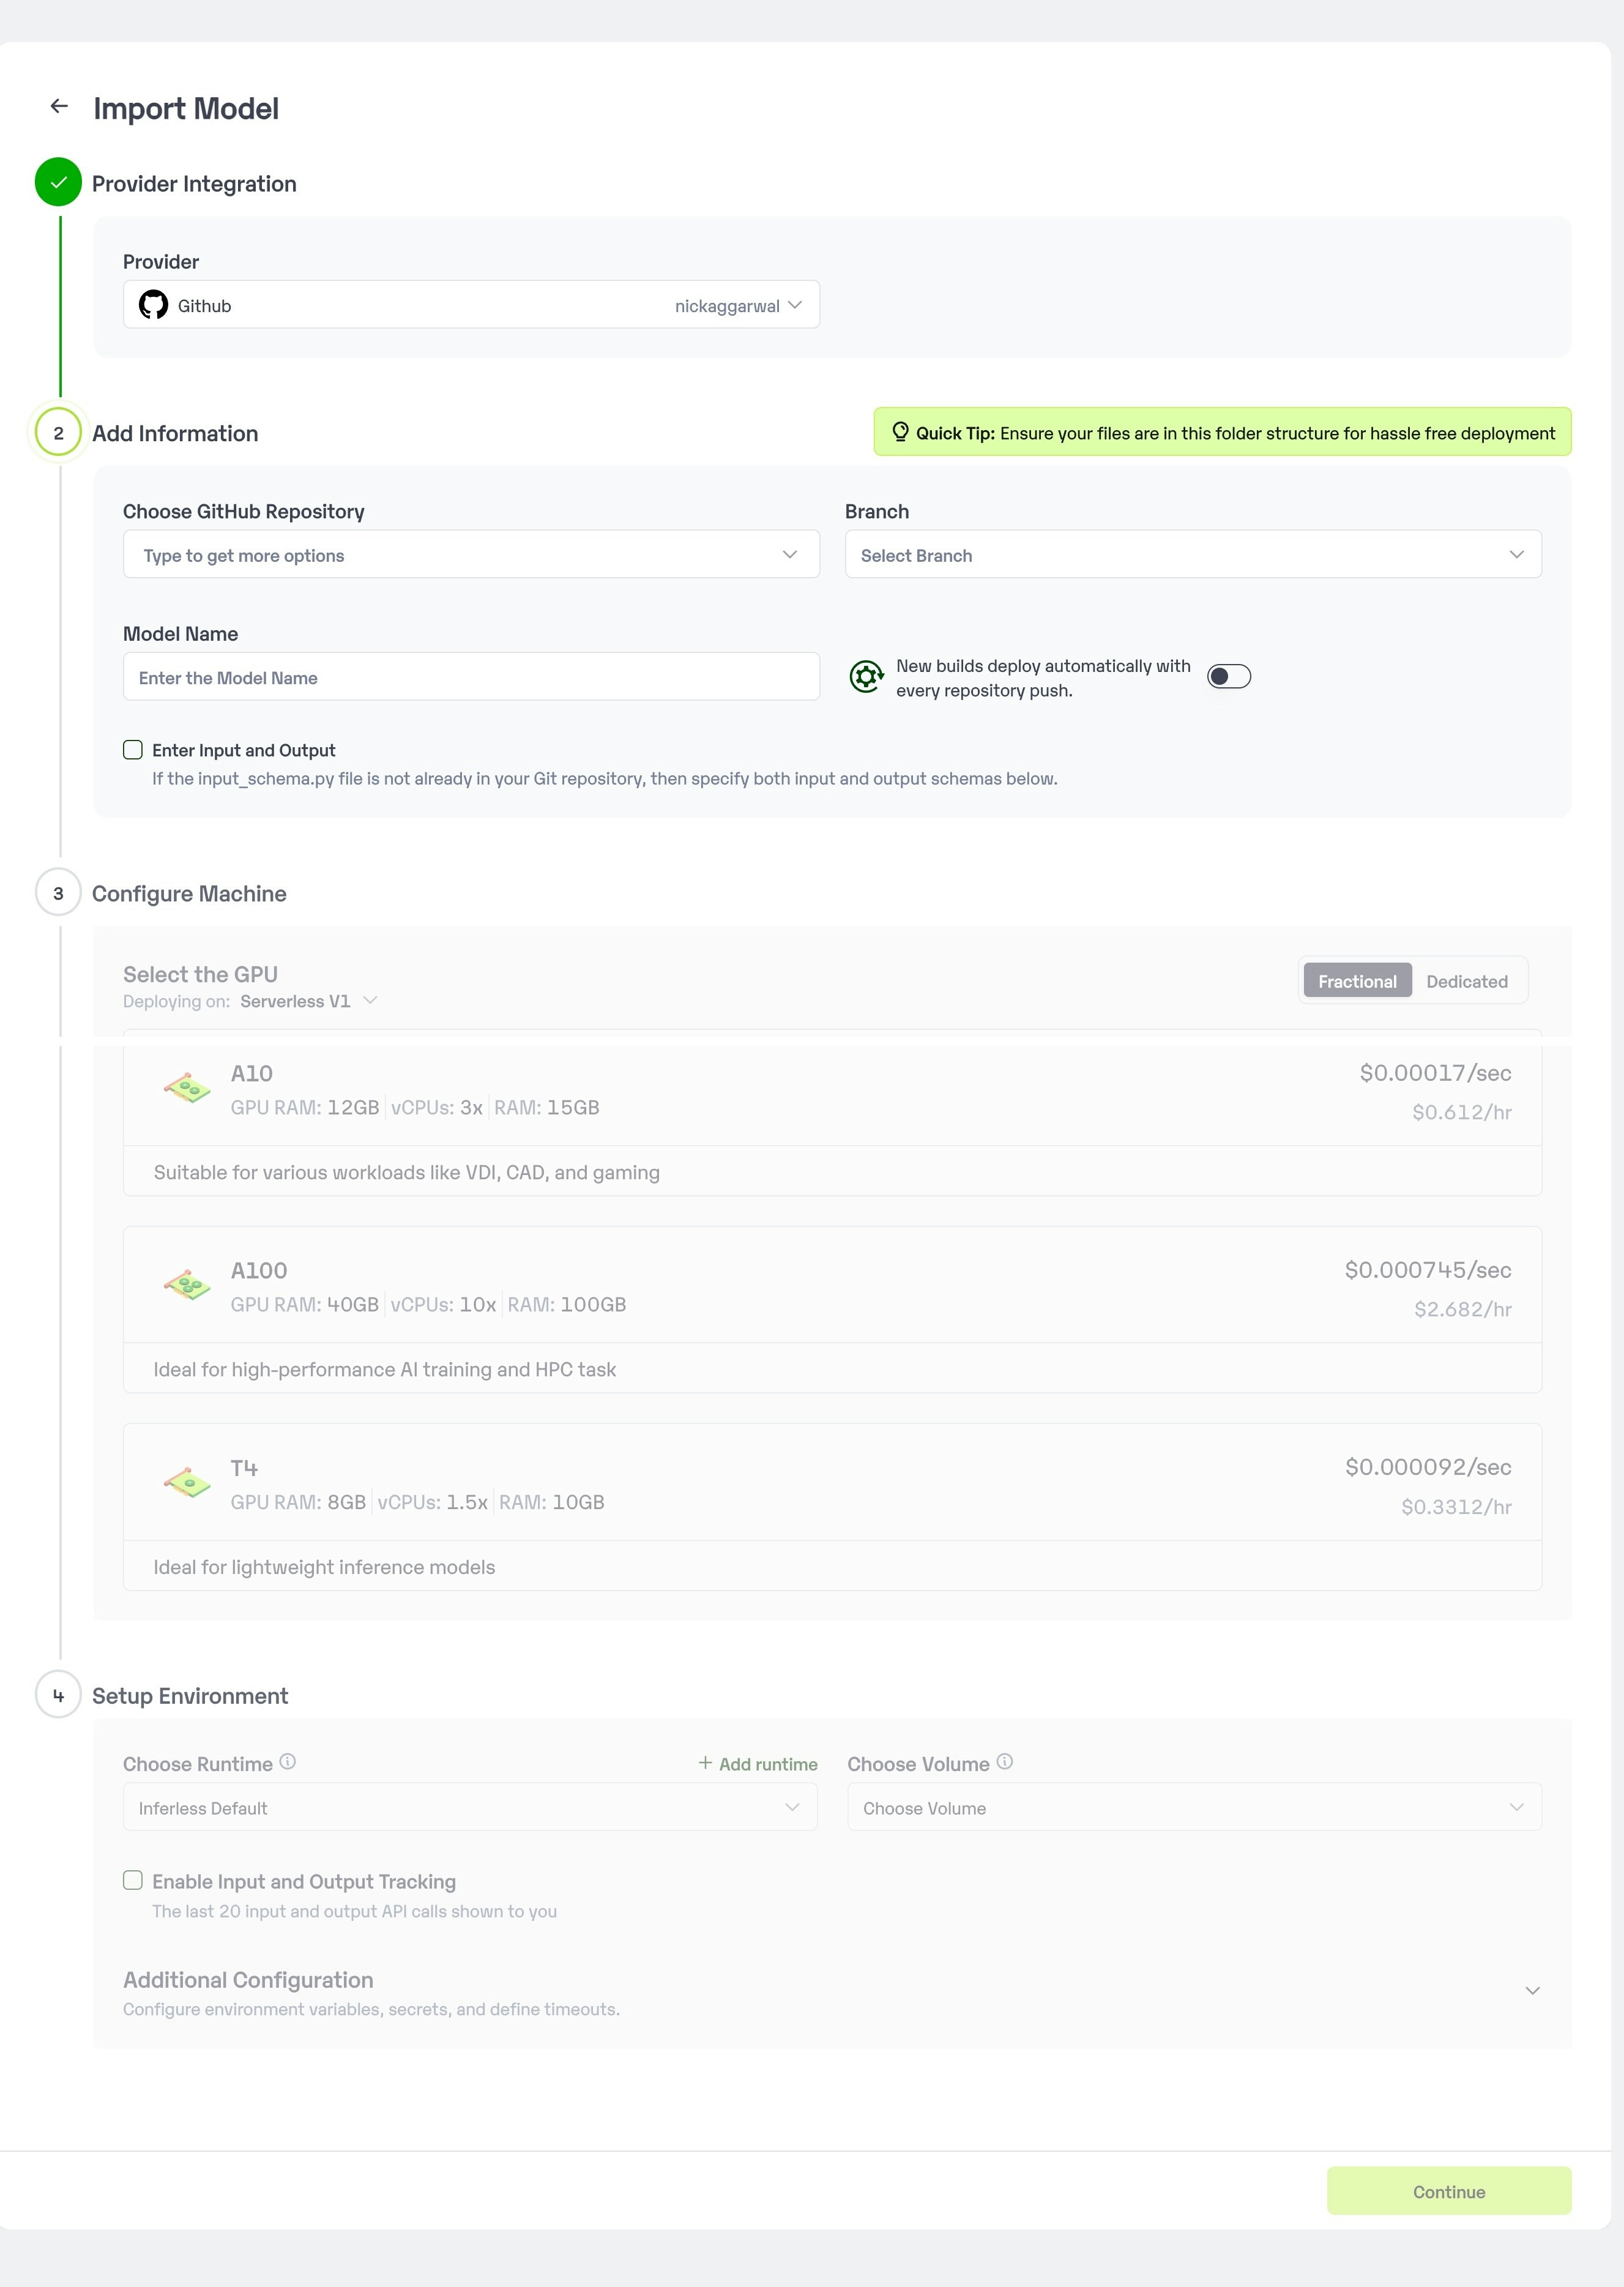
### Step 2: Follow the UI to complete the model Import
* Select the GitHub/GitLab Integration option to connect your source code repository with the deployment environment.
* Navigate to the specific GitHub repository that contains your model's code. Here, you will need to identify and enter the name of the model you wish to import.
* Choose the appropriate type of machine that suits your model's requirements. Additionally, specify the minimum and maximum number of replicas to define the scalability range for deploying your model.
* Optionally, you have the option to enable automatic build and deployment. This feature triggers a new deployment automatically whenever there is a new code push to your repository.
* If your model requires additional software packages, configure the Custom Runtime settings by including necessary pip or apt packages. Also, set up environment variables such as Inference Timeout, Container Concurrency, and Scale Down Timeout to tailor the runtime environment according to your needs.
* Wait for the validation process to complete, ensuring that all settings are correct and functional. Once validation is successful, click on the "Import" button to finalize the import of your model.
 ### Step 3: Wait for the model build to complete usually takes \~5-10 minutes
### Step 4: Use the APIs to call the model
Once the model is in 'Active' status you can click on the 'API' page to call the model
### Here is the Demo:
### Step 3: Wait for the model build to complete usually takes \~5-10 minutes
### Step 4: Use the APIs to call the model
Once the model is in 'Active' status you can click on the 'API' page to call the model
### Here is the Demo:
 ## Method B: Deploying the model on Inferless CLI
Inferless allows you to deploy your model using Inferless-CLI. Follow the steps to deploy using Inferless CLI.
### Clone the repository of the model
Let's begin by cloning the model repository:
```bash theme={null}
git clone https://github.com/inferless/Mixral-8x7B.git
```
### Deploy the Model
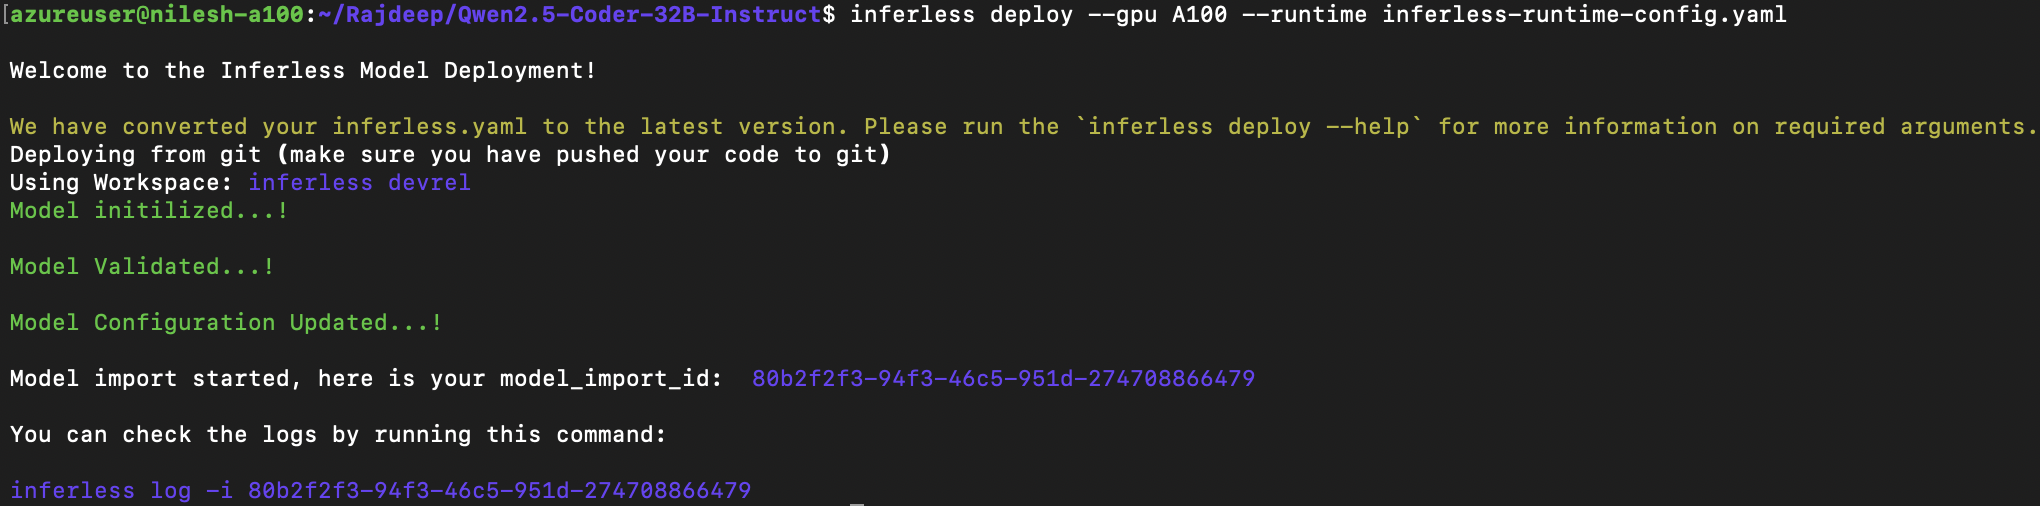
To deploy the model using Inferless CLI, execute the following command:
```bash theme={null}
inferless deploy --gpu A100 --runtime inferless-runtime-config.yaml
```
**Explanation of the Command:**
* `--gpu A100`: Specifies the GPU type for deployment. Available options include `A10`, `A100`, and `T4`.
* `--runtime inferless-runtime-config.yaml`: Defines the runtime configuration file. If not specified, the default Inferless runtime is used.
## Method B: Deploying the model on Inferless CLI
Inferless allows you to deploy your model using Inferless-CLI. Follow the steps to deploy using Inferless CLI.
### Clone the repository of the model
Let's begin by cloning the model repository:
```bash theme={null}
git clone https://github.com/inferless/Mixral-8x7B.git
```
### Deploy the Model
To deploy the model using Inferless CLI, execute the following command:
```bash theme={null}
inferless deploy --gpu A100 --runtime inferless-runtime-config.yaml
```
**Explanation of the Command:**
* `--gpu A100`: Specifies the GPU type for deployment. Available options include `A10`, `A100`, and `T4`.
* `--runtime inferless-runtime-config.yaml`: Defines the runtime configuration file. If not specified, the default Inferless runtime is used.